

Use Out of Vehicle Test to test and verify the condition of a battery that is NOT connected to a vehicle.
___________________________________________________________________________________
Step 0: Power on the CPX and connect the CPX clamps to battery (NOT SHOWN ON CPX SCREENFLOW)
It is important to connect the clamps as soon as possible as the CPX will automatically start the battery test in the background as the battery information is being entered.

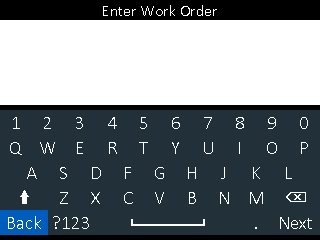
Enter Work Order (if enabled)
To disable Work Order entry, from the Main Menu go to Settings – Tool – Work Order, then uncheck Work Order box

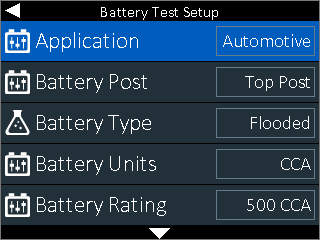
Enter battery details based on the battery which is being tested. (NOTE: The CPX will default to Automotive, Top Post, Flooded, CCA and 500 CCA values.)

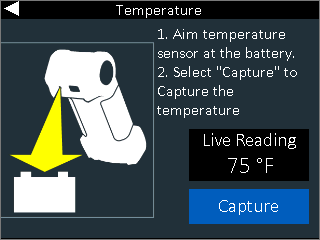
Point the CPX’s temperature sensor (located on the back of the unit) at the battery. Tap Capture.

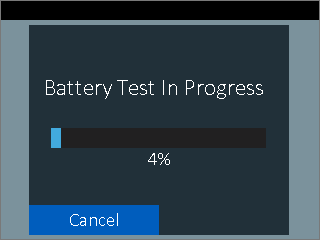
The overall test time using Conductance Profiling is approximately one minute. Due to this test time, it is important to connect the tester clamps as a first step and BEFORE entering the battery information so that test time remaining at this point is minimized.

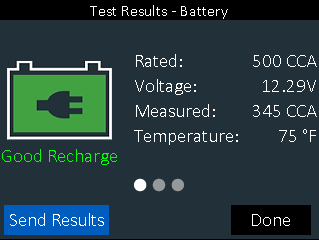
Once the battery test is complete the overall result will be shown along with details on the battery.
Using the touch pad, highlight the three dots and then tap the right touch pad to review the cranking and reserve capacity sub-decisions.
Tap Send Results to either print the test results or send the results via email.
Tap Done to finish the test and return to the main menu.